Skill Level:
Crafting Time:
Material(s):
Category:
Tag(s):
Share This Craft
Search Crafts
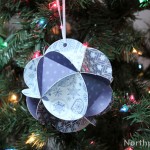
DIY Paper Beads & Snowflake

This sparkly snowflake is a beautiful ornament that will adorn your Christmas tree for years to come. Make the paper beads from any paper you like—we used 12" x 12" scrapbook paper, but really any paper will work. Some ideas are construction paper, magazines, newspaper, or wrapping paper. Kids can have fun making the beads and snowflakes, too!
Supplies & Tools:

- 2 sheets 12" x 12" scrapbook paper, different shades of blue
- Cutting mat
- X-Acto
- Metal ruler
- Pencil
- Clear glue
- Sparkle Mod Podge
- Aleene’s Fast Grab glue
- Toothpicks
- White pipe cleaners
- 10mm clear beads
- Wire cutters
- Paper towels or baby wipes
Directions:
Making the Beads:
- Along one edge of the paper, draw tick marks in 1" increments. Repeat for opposite side.

- Place the ruler diagonally and cut oblong, right triangle strips. Cut 12 strips from the light blue paper and 24 strips from the medium blue paper.

- Begin making the beads by rolling the wide end of a paper strip around the toothpick.
Note: It helps to roll the end a little bit to curl the paper, then unroll it and reroll it with glue.
- Add glue as you roll so that the bead is firm when it dries.

- Continue rolling the paper tightly around the toothpick, adding glue as needed.
Note: Make sure you align the straight edge (not the diagonal side) as you roll.
- When you get to the end of the paper strip, the glue is probably oozing all over the bead. That is a-okay! Simply smooth the excess glue over the entire bead to coat it.
Note: Your fingers will get sticky from the glue. Wipe off fingers as needed, as you may get glue “boogers” on your fingers, which you don’t want on the beads. - Carefully slide the bead off the toothpick and set aside to dry. Be sure to place the bead on cutting mat (or wax paper) so that the bead doesn’t stick to the surface it is drying on.
- Repeat steps 2–7 to make the rest of the beads. You need 36 beads total: 12 light blue beads and 24 medium blue beads.
- When the beads are dry, place each bead on a toothpick, use your finger to coat it with Sparkle Mod Podge, remove bead from toothpick, and set aside to dry. Repeat for each bead.

Assembling the Snowflake:
- Group 6 pipe cleaners together, lining up the ends. Using both hands, pinch the bundle in the center and twist a few times to interlock the pipe cleaners.
- Fan out the pipe cleaners in groups of 2, for a total of 6 “arms.”
- Add a round bead to each arm and push towards the center.

- Now separate the pipe cleaners within each pair and add a medium blue bead to every pipe cleaner with the bead’s pointed tip aiming at the center.

- Bring 2 pipe cleaners from different, adjacent pairs together and add a round bead. Push the round bead as close to the paper beads as possible. Continue adding round beads around the snowflake in this fashion.

- Separate the pipe cleaners again and add light blue paper beads to each pipe cleaner with the pointy tip pointing up.

- Bring 2 pipe cleaners from different, adjacent pairs together and add a round bead.
Note: Before adding the bead, bend the pipe cleaners as shown in the photo:
- Continue adding round beads around the snowflake.

- Separate the pipe cleaners in each pair. Add a medium blue paper bead to each pipe cleaner with the pointy tip pointing toward the center of the snowflake.

- Use wire cutter to trim each pipe cleaner to 0.75" and then fold each end in half. Pinch the fold so that it is small enough to fit through the hole of the round beads.

- Apply a dot of Fast Grab glue to pipe cleaner and then slide a round bead over it. Repeat for each pipe cleaner.

- Allow to dry completely and then your snowflake is ready to hang!