Skill Level:
Crafting Time:
Technique(s):
Material(s):
Category:
Share This Craft
Search Crafts
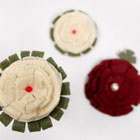
Holiday Ribbon Rosette

This festive rosette is perfect for dressing up a gift in a jar, not only because it’s adorable, but also because the recipient may then reuse the flower as a fridge magnet. This rosette is also lovely as a ribbon replacement on gift boxes or gift bags, as a holiday sweater pin, or even as a hair barrette.
Use whatever color ribbon you like for this craft, but we recommend using non-wired, fabric ribbon, such as double-faced satin or grosgrain. Found ribbon you love, but it’s wired? No problem—simply cut a length of ribbon and remove the wire from either side.
Supplies & Tools:

- Printable template (download here)
- 15 inches of 1.5" wide ribbon
- Scissors
- Needle
- Felt: white, green
- Thread: red, plus a color that matches ribbon
- Ruler
- Hot glue gun & glue sticks
- Adhesive backed magnet
Directions:
- Print template and cut out pieces.
- Trace pieces onto felt and cut out. Alternatively, you can freehand the circles. Set green circle aside.
- Cut a piece of red thread that is about 20" long. Thread the needle, bring the ends of the thread together, and tie a double knot about 2" from the ends.

- To create the felt mint, stack the four felt circles together and begin whip stitching around the edges of the circles.
- To begin, poke the needle up through the middle layer of felt.

- As you sew around the edges, poke the needle through the layers at an angle to make them look swirly.

- To finish, poke the needle up through the bottom layer, and out through the middle layer.

- Tie off the ends of the thread, and hide in between the middle layers of felt. Trim excess thread. For tips on how to hide the thread, view this article.
- The mint is complete. Set aside.
- To begin, poke the needle up through the middle layer of felt.
- Cut ribbon into 3" pieces.

- Cut a piece of thread (to match your ribbon) that is about 20" long. Thread the needle, bring the ends of the thread together, and tie a double knot about 2" from the ends.
- Take one piece of ribbon, fold in half, and sew a running stitch about 0.25" from the raw edges. Do not cut the thread. (For the purpose of the photo, we using contrasting thread.)

- Repeat for each remaining piece of ribbon, adding each one to the same piece of thread.
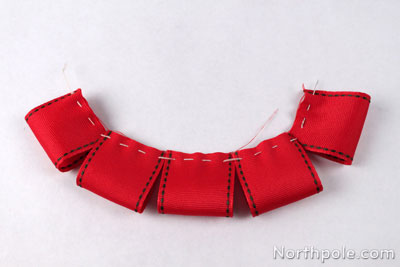
- Now tie the ends of thread together, cinching the ribbons. Pull the thread taut and then double knot it. Trim excess thread and set aside.

- Arrange the ribbon petals to lie flat.

- Use hot glue to glue the felt mint over the center of the ribbon rosette.

- Glue the green felt on the back of the rosette.
- Cut two 1.25" pieces of the magnetic strip and stick to the back of the rosette. If the magnet adhesive doesn’t stick to the felt very well, use some hot glue.

- Now your rosette is finished!

Ideas from the Elves:
- Skip the magnet and glue the rosette to a pin and wear as a brooch. Depending on the hardware you use, you could sew the pin to the green circle (before step 12) and then glue the green circle to the rosette.
- Glue the rosette to a headband or barrette.
- Glue a mini clothespin to the rosette and clip it on gift bags, presents, or anywhere you like!
- Glue rosette to a clothespin, add magnetic tape to the clothespin, and stick it on the refrigerator and use it to hold holiday cards.