Skill Level:
Crafting Time:
Technique(s):
Material(s):
Category:
Tag(s):
Share This Craft
Search Crafts
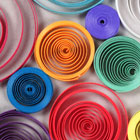
Snowball Bowl

Would you believe us if we told you that this bowl is made of paper? Well, it is! Each little “snowball” is a thin strip of paper that has been hand-twirled into a small coil. Whether you give this bowl as a gift or put it on display in your home, others will be impressed when they learn how you made it! This bowl is for decorative purposes only, although you may like to put light items in it, such as wrapped candy.
The snowball bowl takes quite a while to complete since you need to make a lot of coils to construct it. We found that it was easier to work on the coils in batches rather than rolling them all at once; otherwise your hands might get really tired. If you spend a few weeknights making the coils, then you’ll be ready to assemble the bowl on the weekend. The coils are pretty easy to make once you get the hang of it, so why not enjoy a movie while you work?
If you’re new to quilling, read this Quilling 101 article to familiarize yourself with the basics of quilling before getting started on your own snowball bowl.
Supplies & Tools:

- White copy paper, 15 sheets
- Slotted quilling tool
- Cutting mat
- Metal ruler
- X-Acto
- Mod Podge
- Foam brush
- Small paintbrush
- Balloon
- Bowl (to hold the inflated balloon)
- Clear acrylic spray paint
- Newspaper or cardboard
Directions:
- Using the grid on your cutting mat as a guide, cut the white paper into 0.25" strips, cutting along the long side of the paper. Reserve 9 strips for the feet and set aside.
Note: Even though the standard width of quilling strips is 0.125", we used 0.25" wide strips because they are easier to cut, plus they make a sturdier bowl. - Roll at least 450 loose coils. New to quilling? Check out this Quilling 101 article.
Note: As mentioned above, rolling the coils will take quite a bit of time. Instead of making them all at once, you can spread the work across several days. That way you’ll give your hands and arms a rest. - Reserve remaining paper strips and set aside. You will use the leftover paper strips in step 8.
- Inflate the balloon to a 7.5" diameter.
- Place the balloon in a bowl. Use the foam brush to generously coat the upper half of the balloon with Mod Podge.

- Beginning at the top of the balloon, start adding the snowballs.

- Continue adding snowballs and apply more Mod Podge as needed. Don’t worry about making the rim of the bowl perfect—we like the uneven appearance.

- Once you’ve added all the snowballs, begin filling in the gaps with small coils. It helps to make each small coil to fit in each unique gap since the gap size will vary. To make small coils:
- Tear the remaining paper strips into thirds.
- Roll the strips to make little coils. (If you roll these coils with the torn edge on the outside of the coil, the edge will look more seamless.)
- With the coil still on the quilling tool, insert the coil in a gap and loosen the coil to fit that gap. Hold the coil, remove from gap, and secure the edge with a tiny bit of Mod Podge. The coil is now custom-sized for this particular gap.
- Use a small paintbrush to coat the gap with Mod Podge and then insert the coil back into the gap.
- Repeat to fill in all the large gaps.

- Allow the bowl to dry completely.
- Meanwhile, make the feet for the bowl. Gather the 9 strips that you set aside in step 1. Make three tight coils, each from 3 paper strips. When quilling, spin the coils tightly to make a solid disc. See this Quilling 101 article for more details and images on rolling the tight coils.
- When the bowl is completely dry, pop the balloon and remove from the bowl.
- Use an X-Acto to remove the Mod Podge boogers. (Use a fresh blade for best results.)
Note: For areas that are hard to cut because the dried Mod Podge is thick, use wire cutters to snip the Mod Podge away.
- Place the bowl on flat surface and place the feet under the bowl, finding where they best fit.

- Remove one foot and apply some Mod Podge to glue it in place. Repeat to glue the other two feet. Allow to dry.
- In a well-ventilated area, lay down a large piece cardboard. Place the bowl on top of cardboard and then spray the exterior of the bowl with several light coats of clear acrylic spray paint. All of the paper coils should be evenly coated and the bowl will still be a little flexible after it is dry.
Note: It is very important that you spray multiple light coats of spray paint. Do not spray a heavy coat, otherwise the spray paint may turn yellow and form blobs. - When the exterior of the bowl is dry, spray the interior of the bowl with 2–3 coats of clear paint.